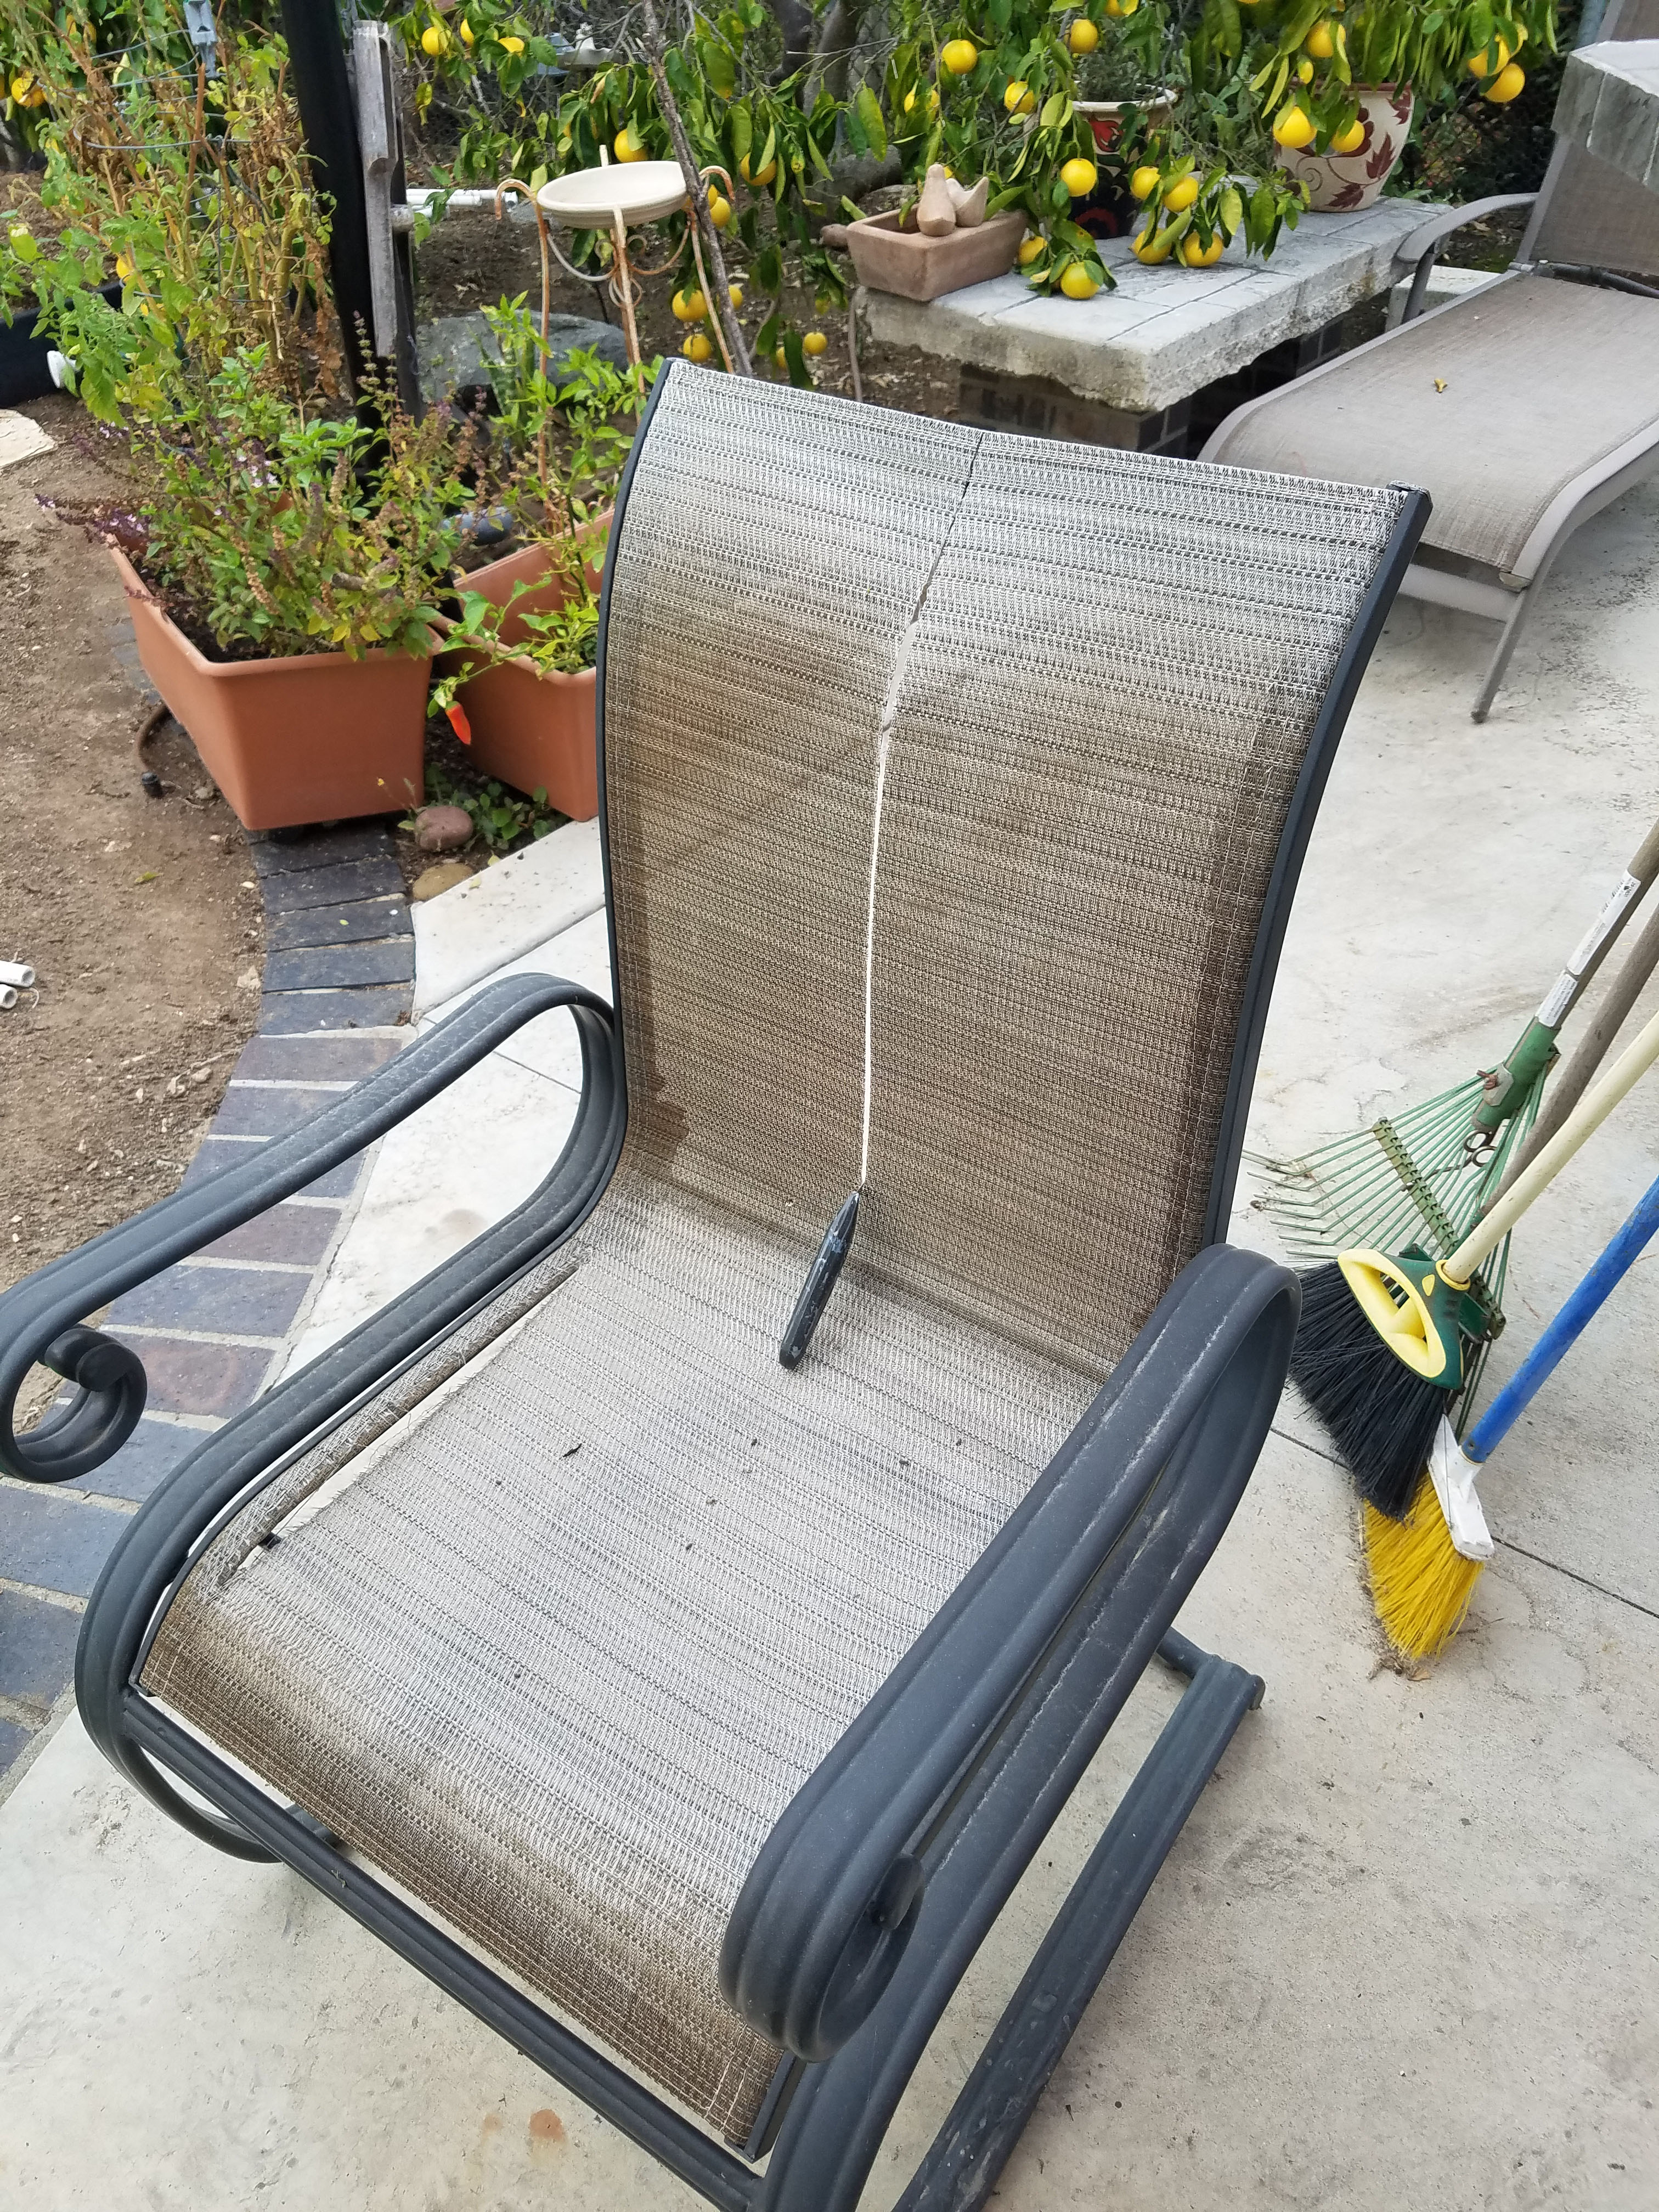
Replacing Fabric on a Sling Patio Chair
Hampton Bay is a popular brand of patio chair sold at Home Depot and we have a set of 6. Unfortunately, in the intense Southern California sun, the fabric on these chairs wears out after a few years. At this point the choice is either, throw out the chairs, or replace the sling fabric. This post is on how to replace fabric on a sling patio chair at a fairly low cost.
I am by no means an environmental fanatic. However, one thing that upsets me is how much Americans tend to throw things away. In many cases, this is because repair is difficult and products from places like China can be inexpensive. Our patio chairs could be completely replaced for $500 and it becomes a question of how much time and money would it take to repair the chairs.
The basic problem with our chairs was the fabric, called a sling, became worn and torn. We needed new slings and I set out to find how hard it would be to replace them. I looked at several sites offering replacements and found they cost from $50 to $60 per chair. Considering a full new chair could be bought for about $80 this makes the landfill look like a prime option.
Then I came to the Sailrite site which had complete instructions and videos. Unlike the other options, Sailrite does not cut and sew the fabric for you. Instead they simply send you a roll of fabric. After watching the video and estimating the cost I realized I could do all six chairs for about $100 if I used Sailrite. In other words, a saving of up to $250 versus ordering a precut sling.
The issue was, I did not know how to sew, and the 30-minute Sailrite video made it look complicated. However, when watching the video I realized the hardest part seemed to be installing the sling on the chair. This was a step that had to be done, even if you order a pre-cut and sewn sling. The slings from the pre-cut companies came with minimal instructions that made this process look deceivingly simple. I knew it wasn’t that easy.
I decided to take the plunge and order from Sailrite. My daughter has a sewing machine and has taken sewing classes so I figured she could help. I am really glad I did. It gave me a chance to learn a new skill, sewing, and I saved a great deal of money. After a learning curve, where the first chair took about an hour, I was able to do the next five chairs in under 30 minutes. As I guessed, the hardest part was not cutting and sewing, but installing the fabric on the chair.
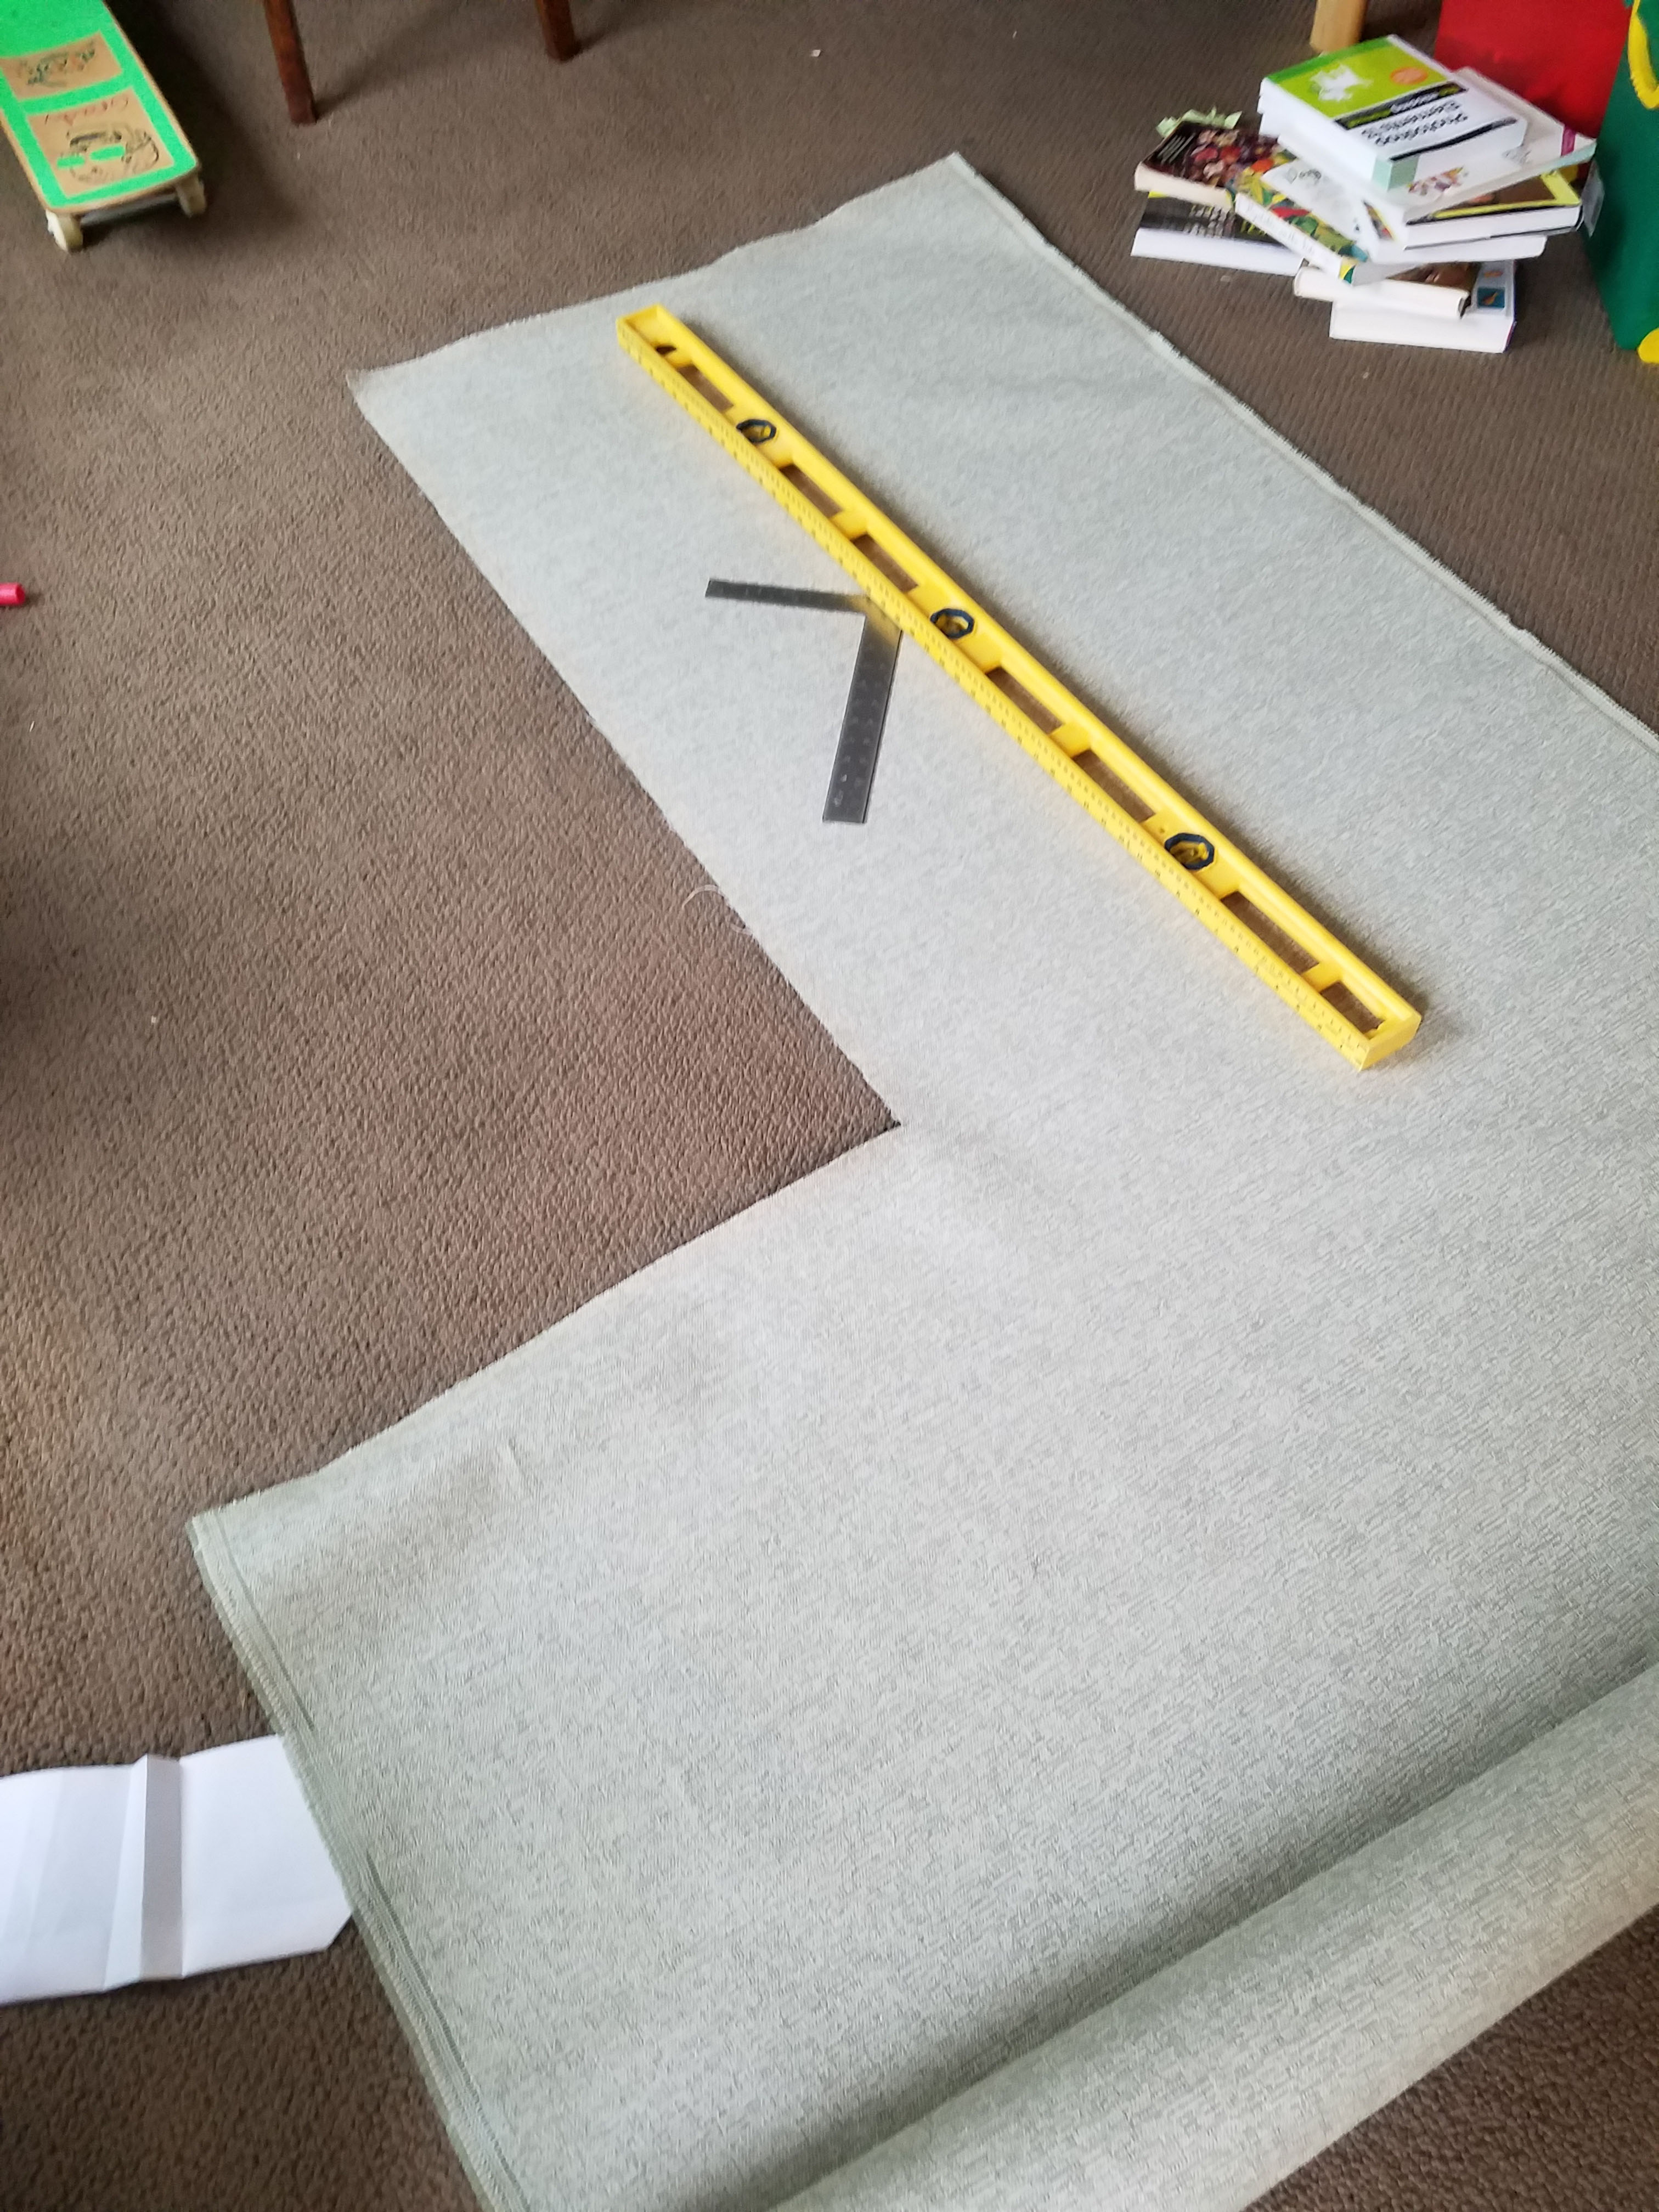
It is strongly recommended to watch the video, but I will highlight some of the key issues I found. The first is measuring how much fabric you need. It seems complicated but it is easy. You simply measure the width and length of your chair and plug it into two formulas. The goal is to see whether it is more effective to cut your fabric lengthwise or widthwise.
If you run the fabric down the length of the chairs you will have two chairs per width of fabric. The fabric has a width of 54” so to do this you need to have chairs with 20.5” or less of width (accounting for seams). Assuming this is the case the formula is the length in inches + 2 inches times the number of chairs divided by 2.
Fabric Requirement Formula 1: ((length+2) times number of chairs)/2. This final number is divided by 36 to get the number of yards.
In our case the length was 43.5” so it was 43.5 plus two for 45.5. 48 times six chairs is 273 and that divided by 2 is 136.5. Taking 144 and dividing by 36 and you get about 3.8 so I needed 4 yards of fabric.
If the length of your fabric is 52” or less you can arrange the fabric lengthwise across the width. The formula is simply width in inches plus six times the number of chairs.
Fabric Requirement Formula 2: (width + 6) times number of chairs. Again, this final number is divided by 36 to get the number of yards.
In our case the width was 18.5” so it was 18.5 plus 6 for 24.5. 24.5 times 6 chairs is 147. That divided by 36 is 4.08. That means 4 yards would not be enough and you need 5 yards. So I went with option 1 and ordered 4 yards.
All this is explained starting around minute 3 of the video. It seems complicated but is pretty simple. If you struggle with the equations here now is the time to stop and order pre-cut slings.
The one thing that is not clearly explained is the need to divide by 36 to get the total yards.
At this point you need to order the fabric. The video talks about weight in ounces per square yard. Anything 16 ounces and under works fine for home sewing machines. Above that you need a more heavy-duty fabric. I went for a 16 oz fabric at $21 a yard. At 4 yards for six chairs this comes to $84. I think this is the one I ordered.
In addition to the fabric you need to order the sling chair spline cording for about $0.40 a foot. To calculate this, it is the length of your fabric in feet times the number of chairs times two, for each side of the chair. For me this came out to 43.5 feet, or about $18 worth of cord. So everything came to $102 plus tax.
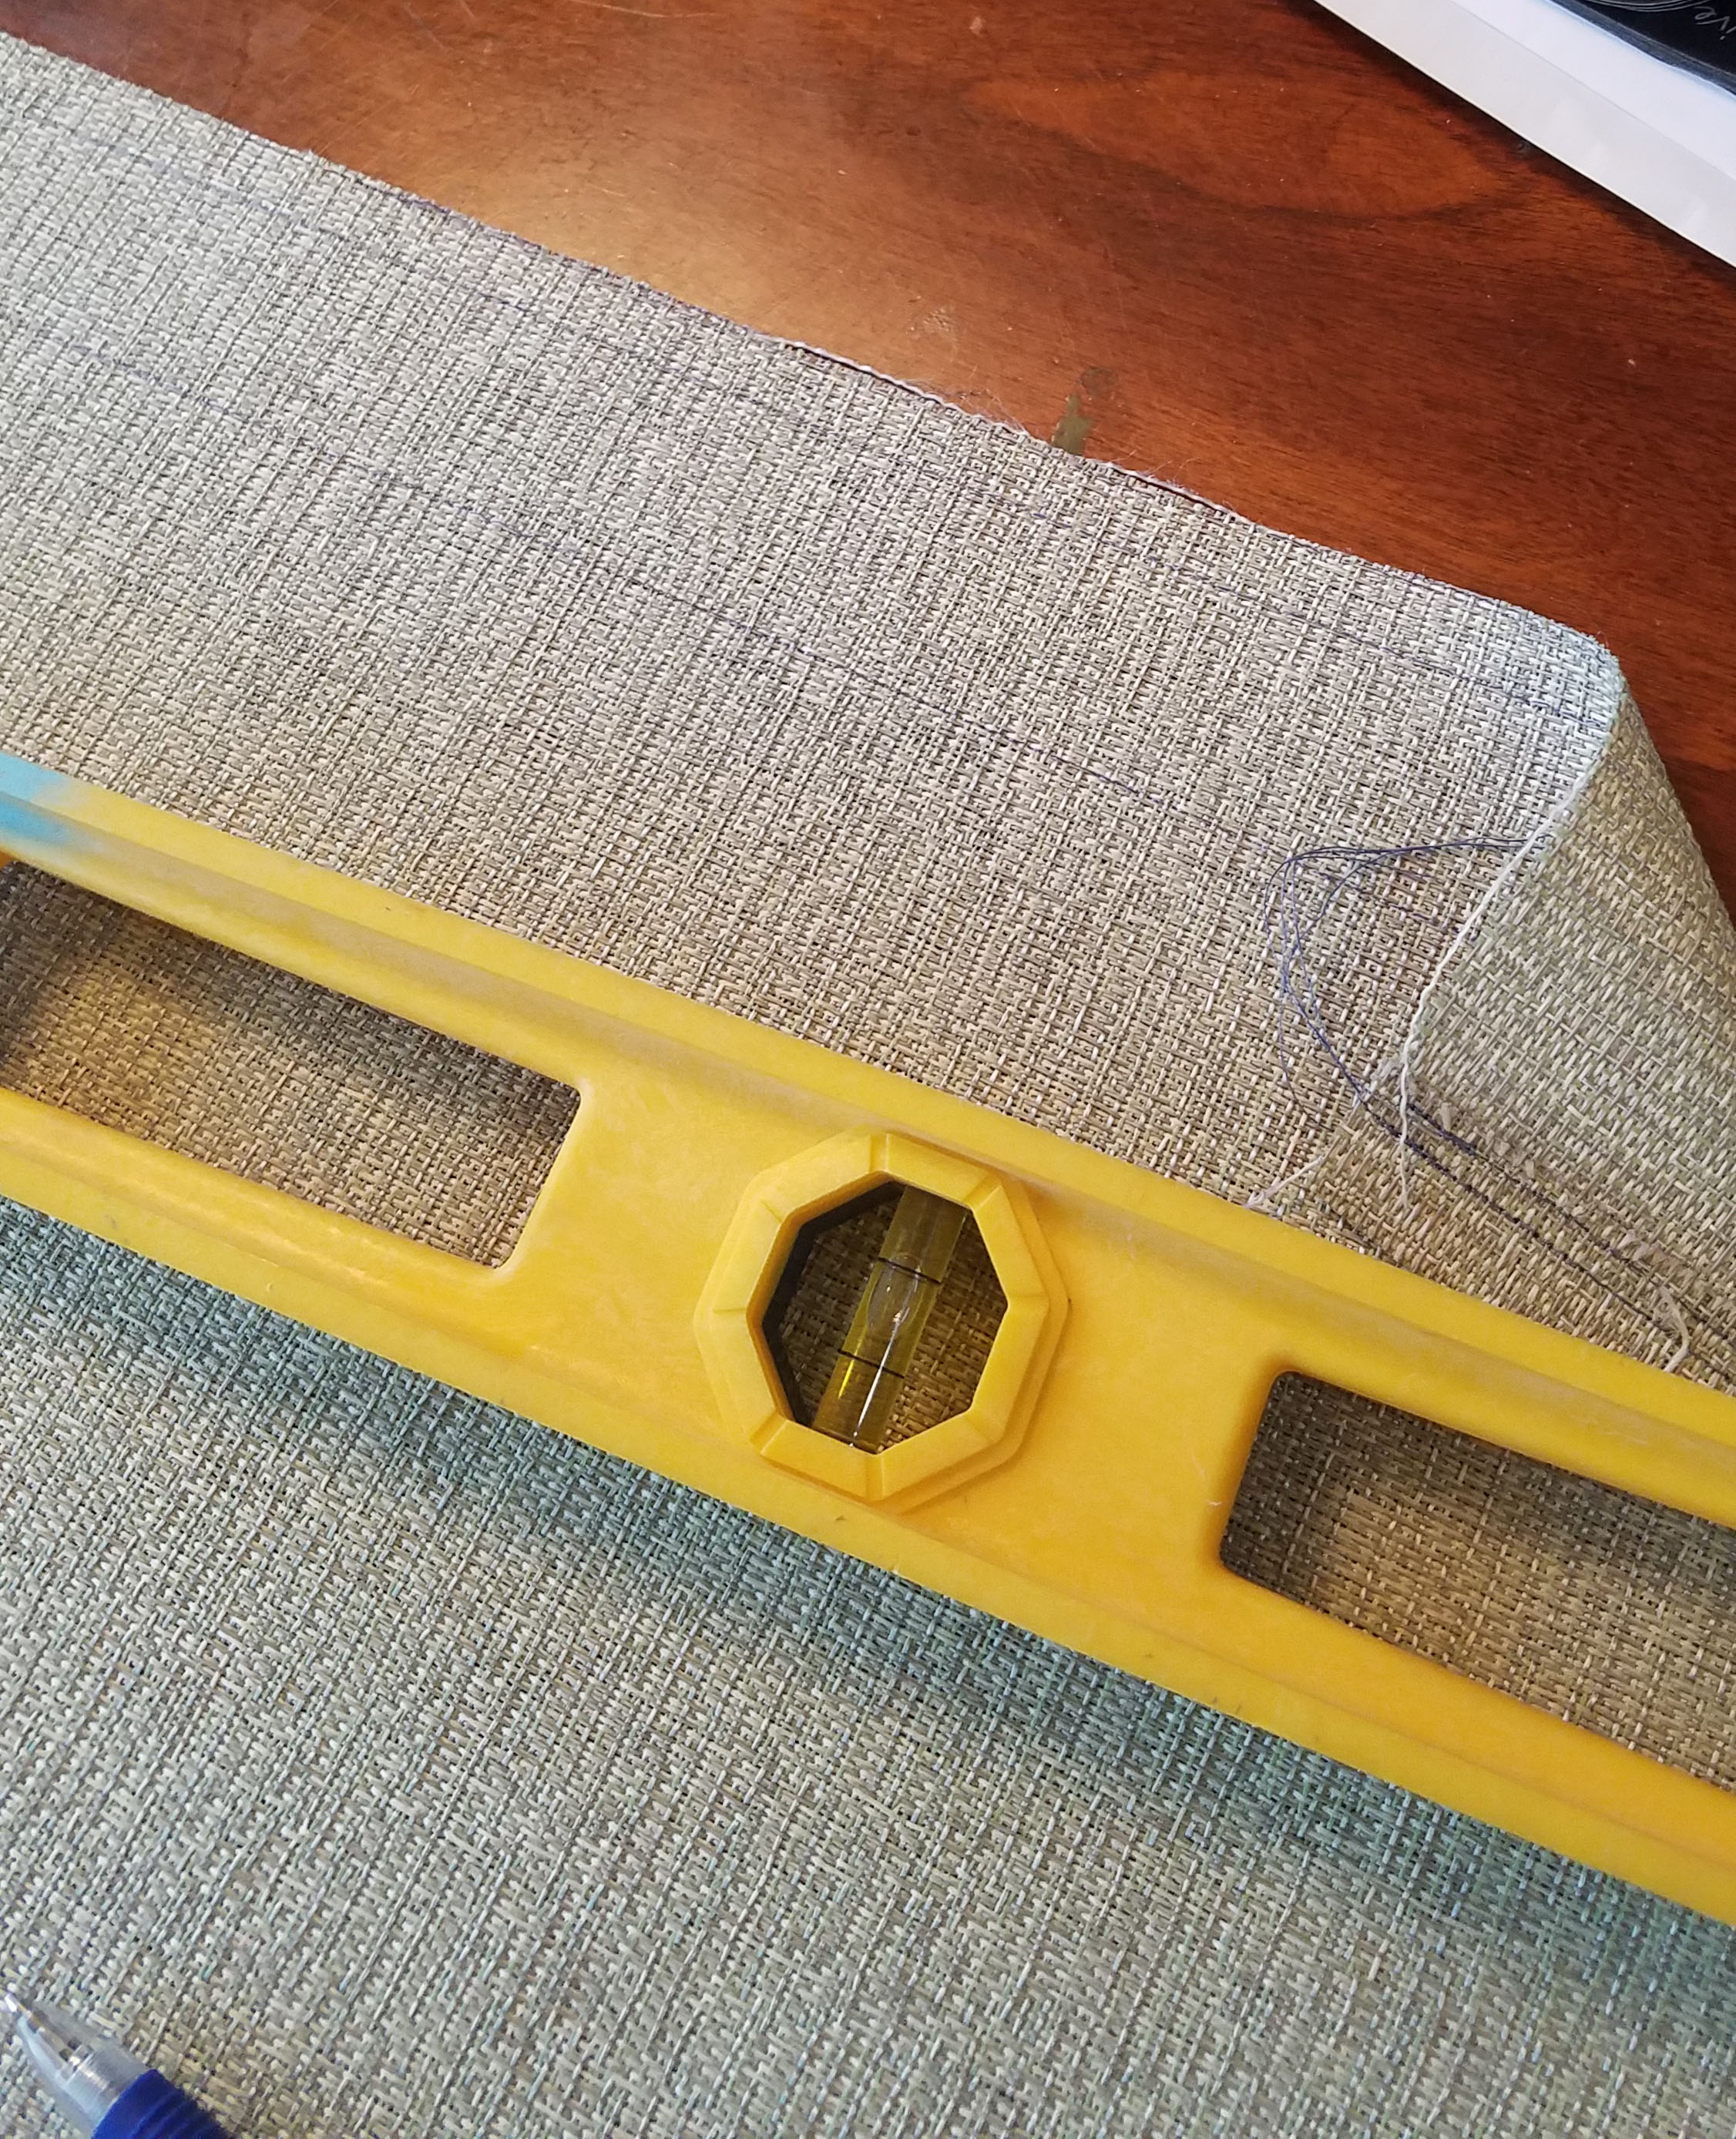
The fabric came in just a couple days. Once the fabric arrives the next step is cutting. This involves taking the measurement of the sleeve slot where the cording will fit. In the video and in my case, it was 5/16ths of an inch. To measure the cut width, you take the width in inches plus 4 plus two times the slot width.
Cut Formula:
Cut Width = Width + 4 + (slot times 2)
Cut Length = Length + 2
In my case, 18.5 + 4 + .625 = 23.125 for the width
The cut length is simply the length in inches plus two, or in my case 45.5 inches.
Cutting is shown around the 10-and-a-half-minute mark of the video. For the first chair I was extremely careful to measure to the nearest eighth of an inch. For the next few chairs I was not quite as careful, realizing there is significant give in the fabric. After the first one, the measuring and cutting portion took about five minutes.
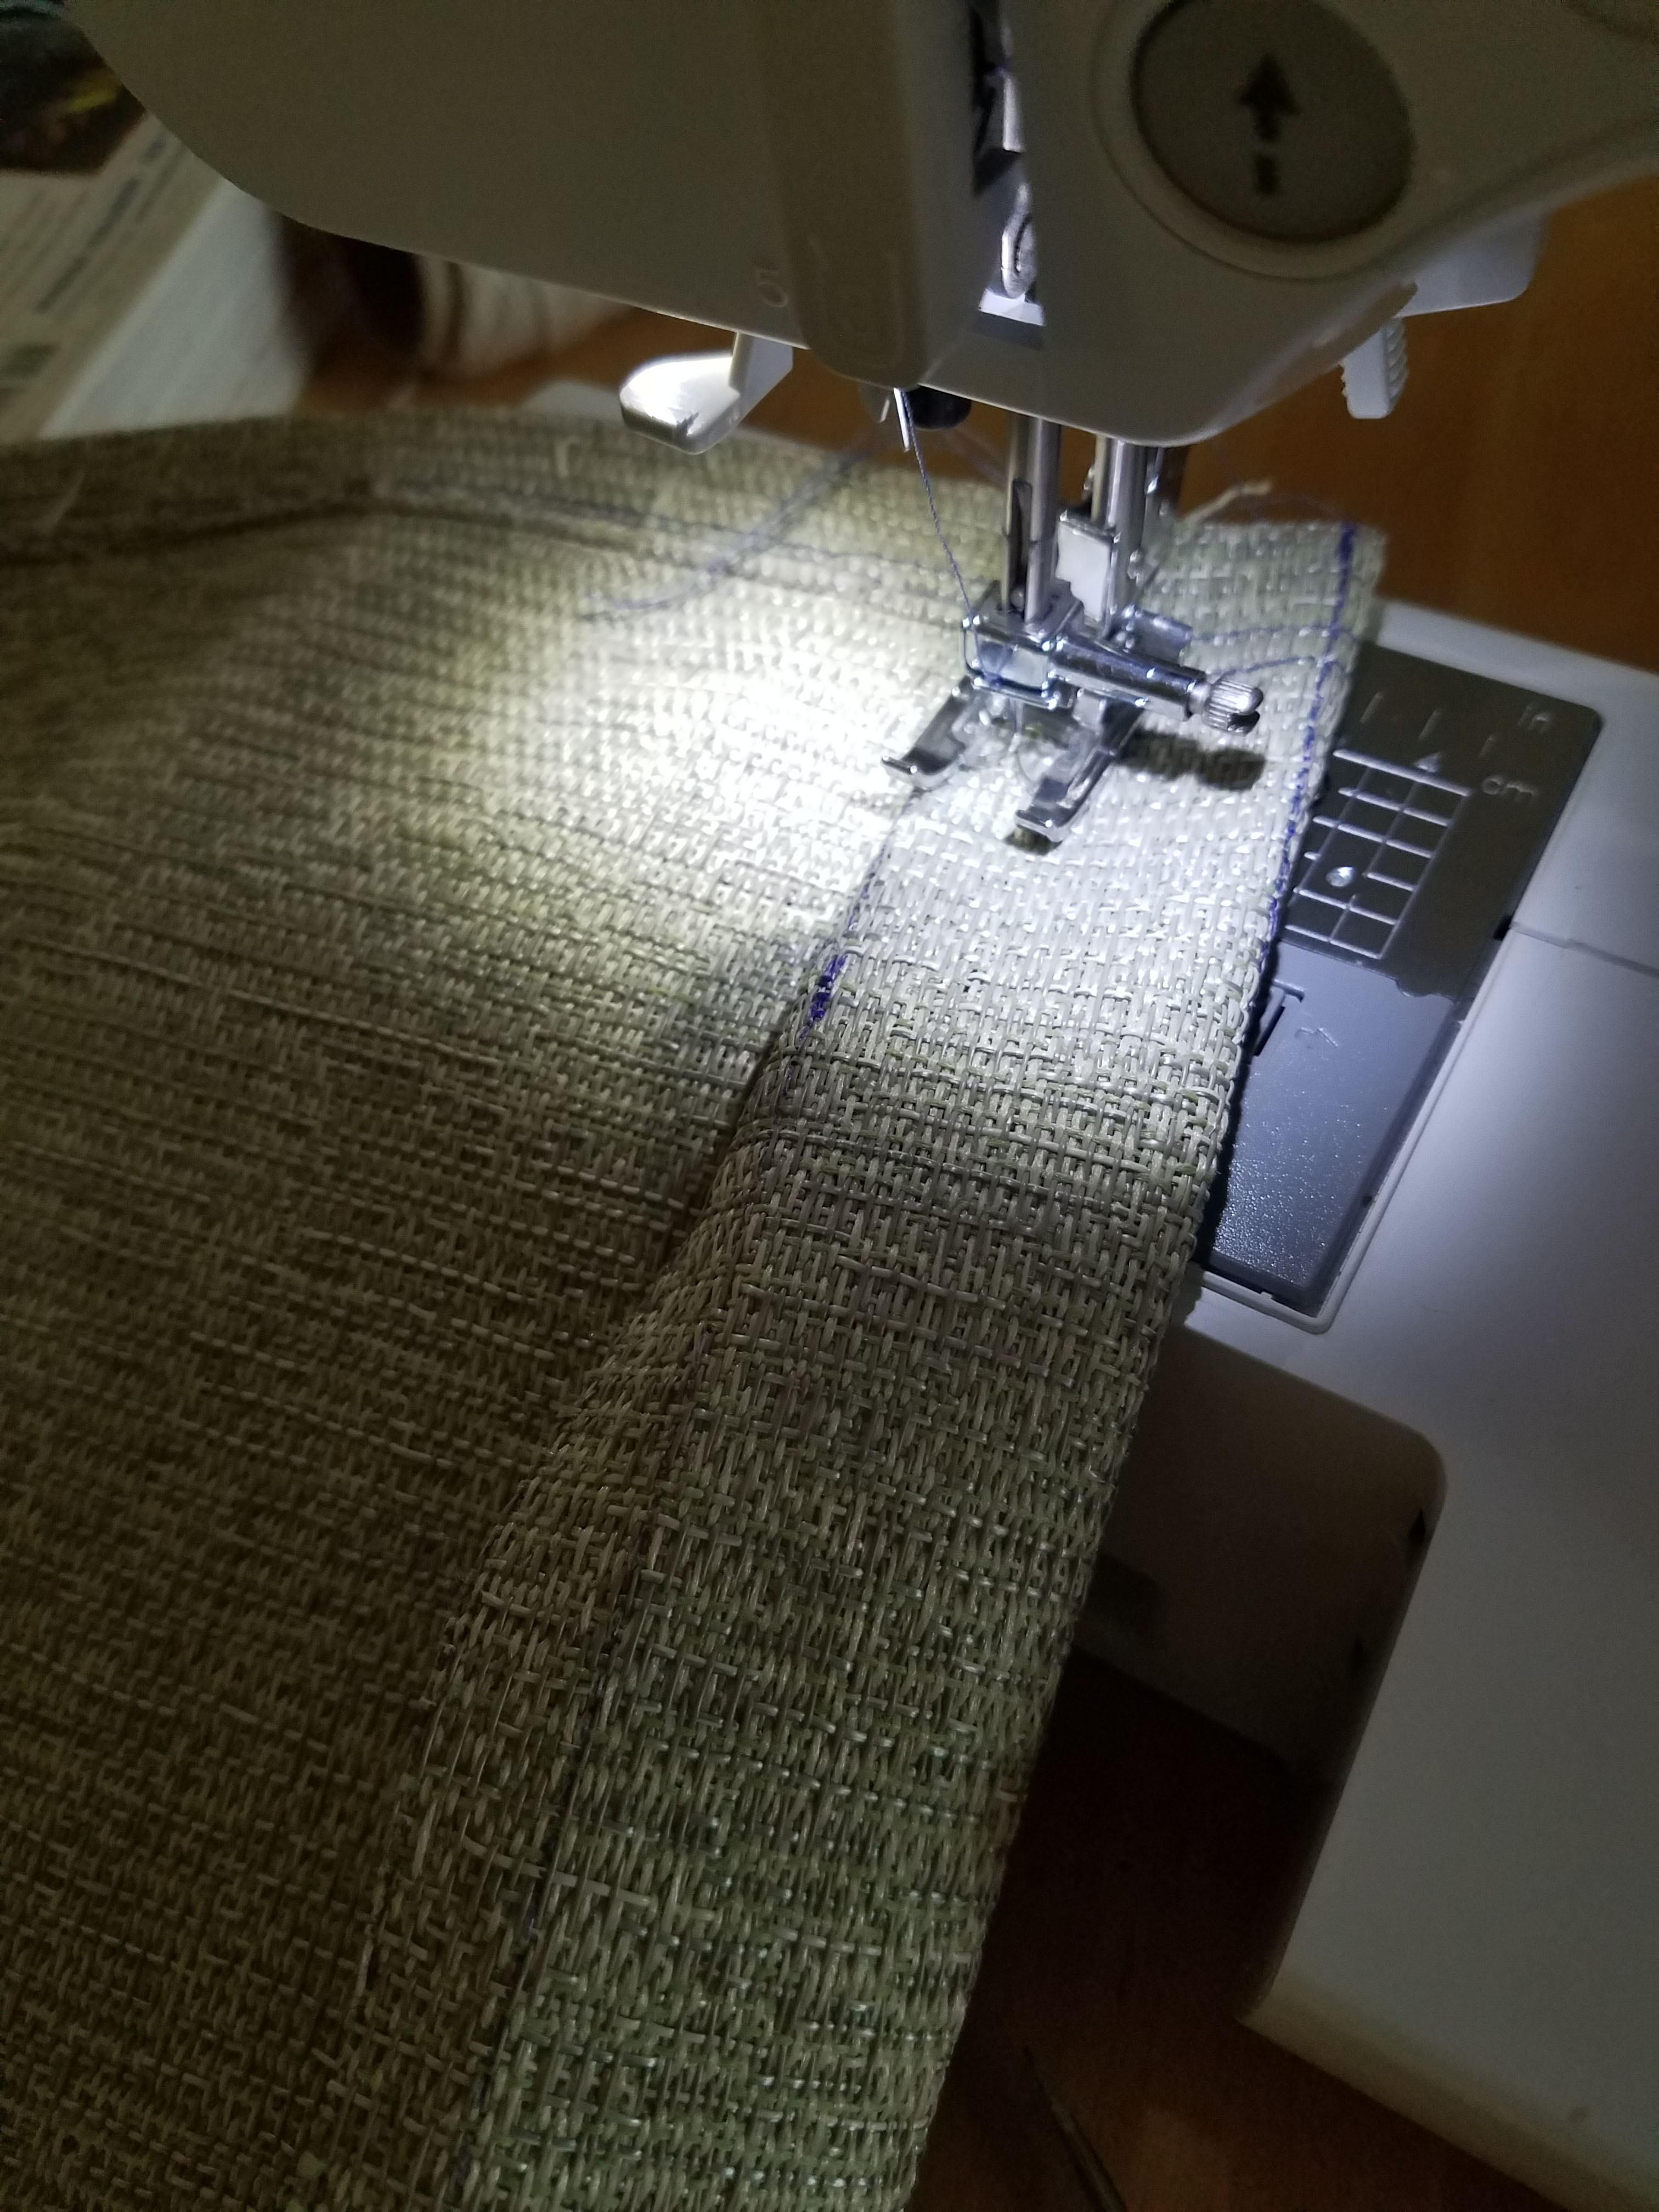
Sewing was the part that intimidated me because I had never done it before. However, this Brother CS-6000i sewing machine I had bought for my daughter proved very easy to use. It took me about a half hour of fussing and I was up and going. After the first chair I was able to sew the other chairs in under 5 minutes each.
The sewing part involves folding the fabric 1 inch along each end of the width and doing a double sew. The length side sew is a little trickier. I recommend watching the video around the 13-minute mark. Basically you fold along the length at 2 inches and then again at a half inch. You fold these over to create the sleeve with the slot for the cord that runs lengthwise. This is a little trickier not just for the folding, but also because it is tougher on the needle when sewing. I ended up going through two needles and you need to make sure you have a heavy-duty needle.
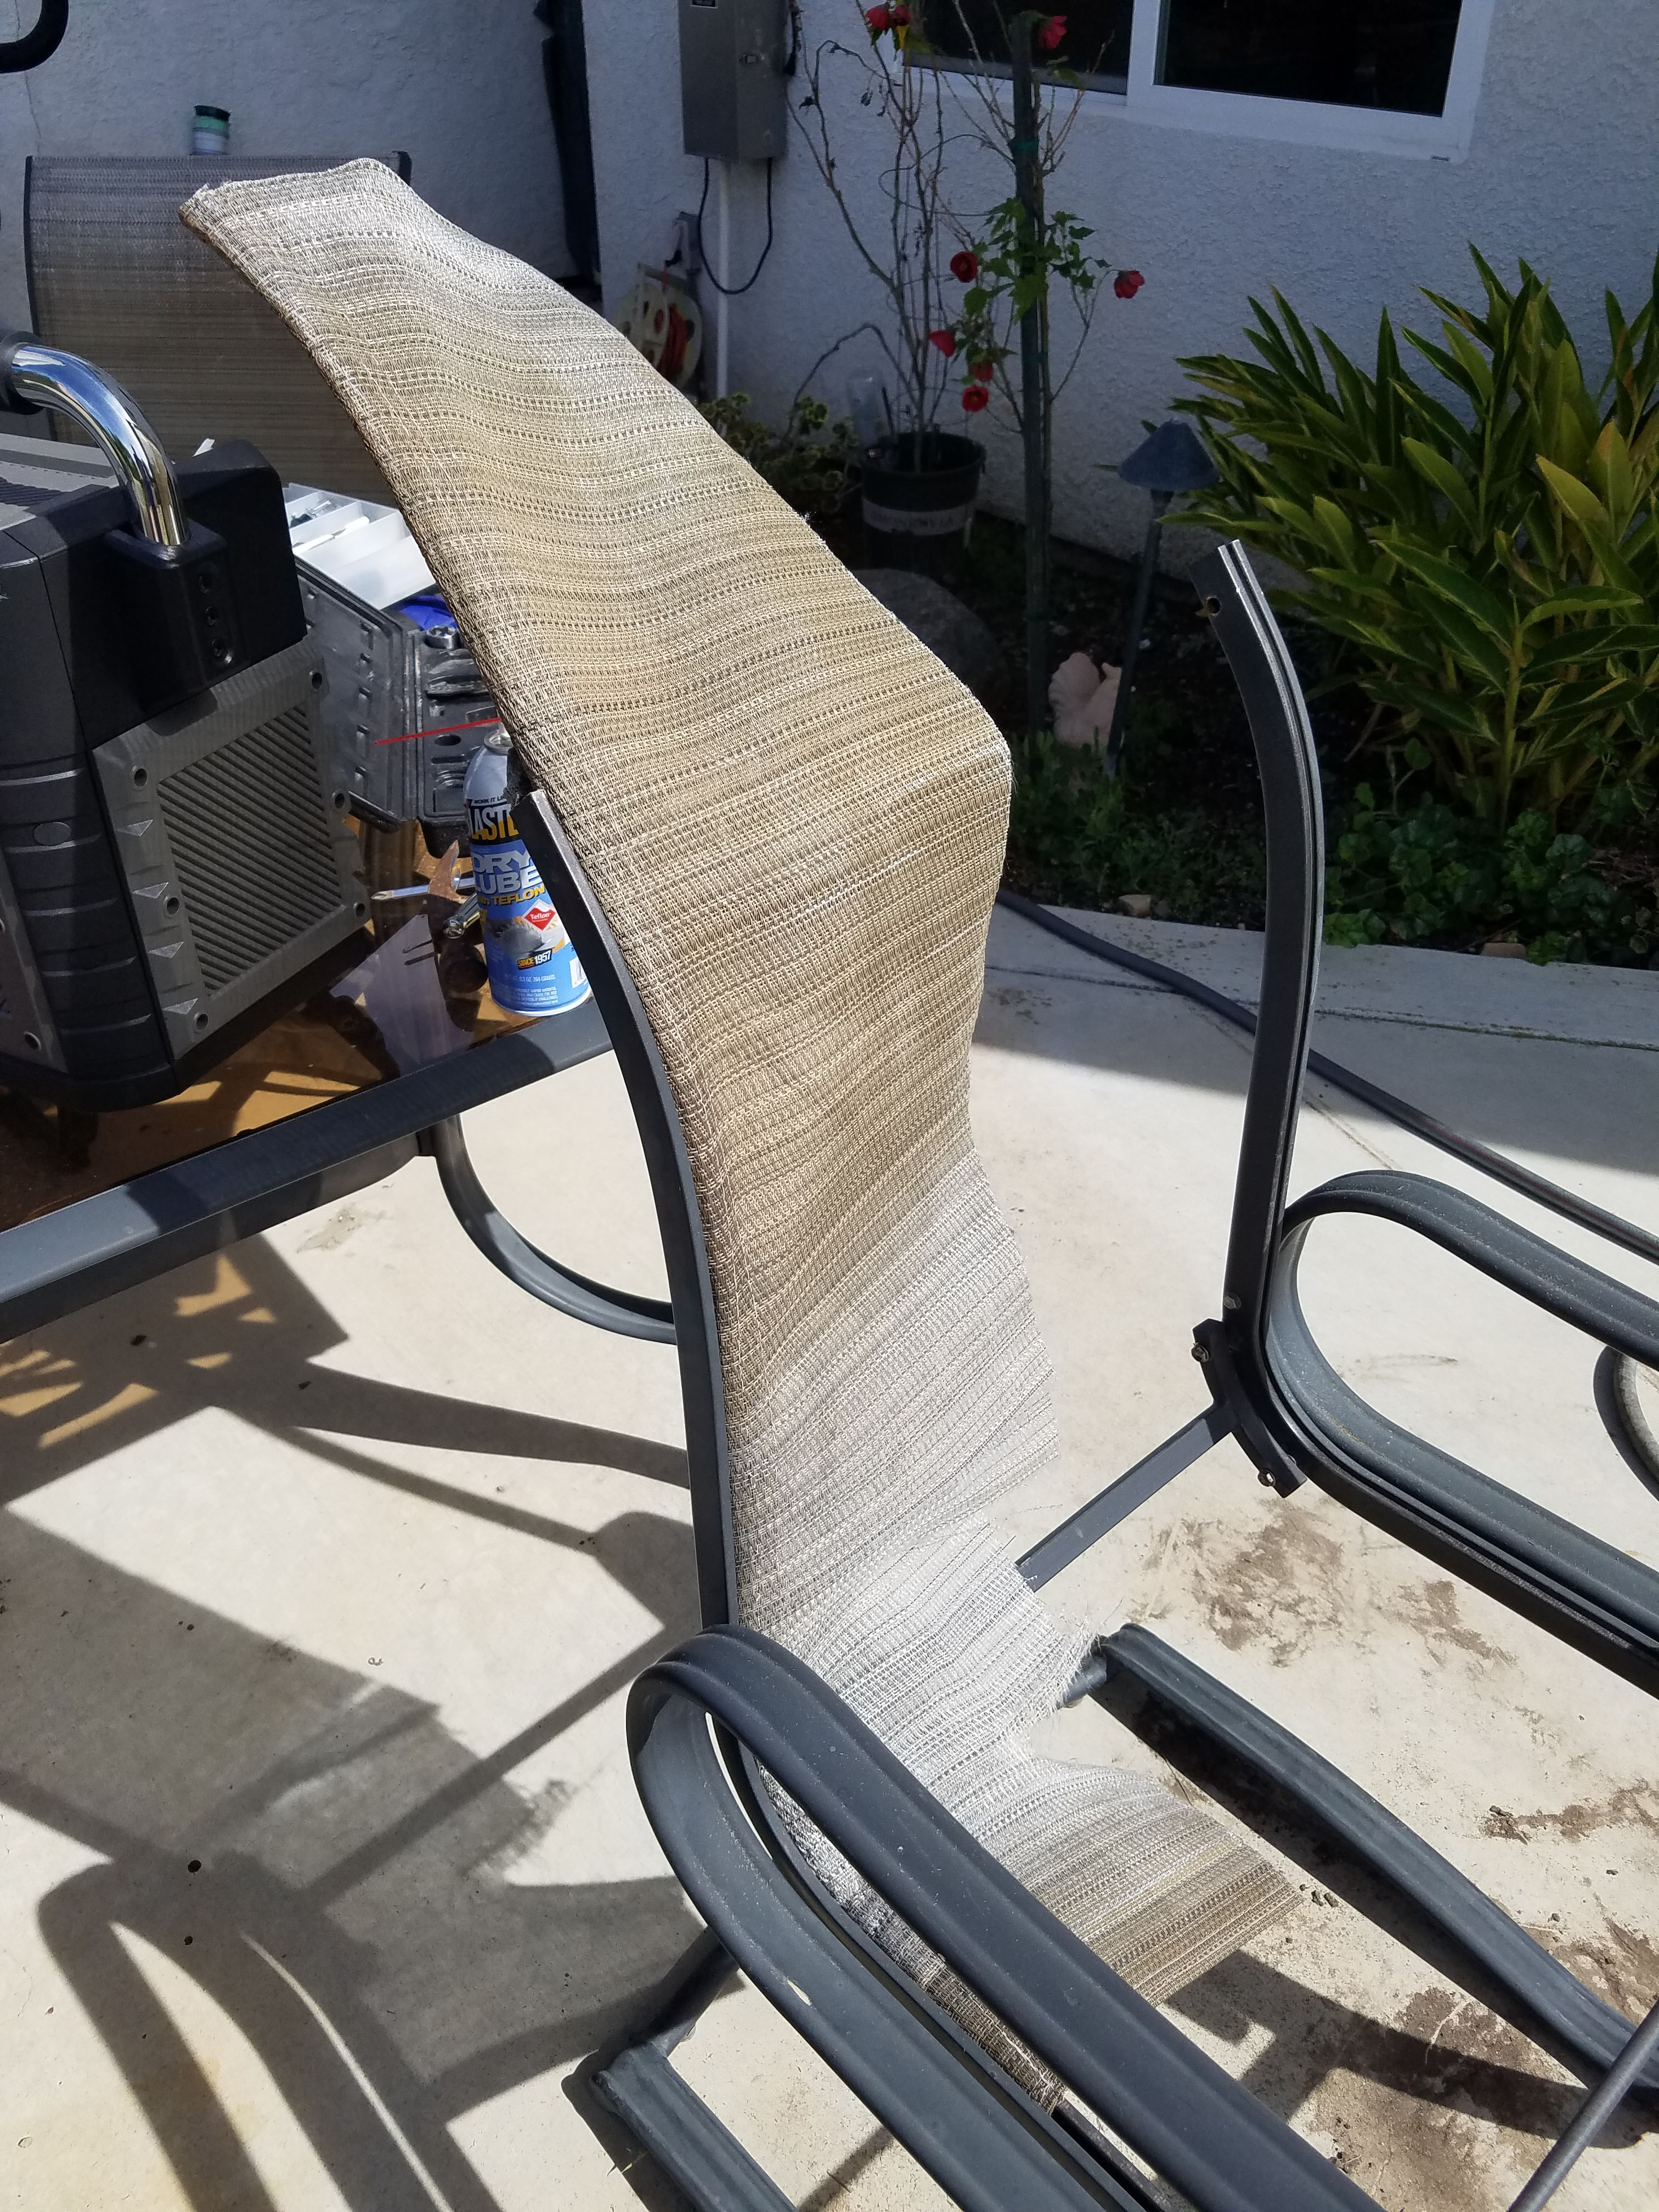
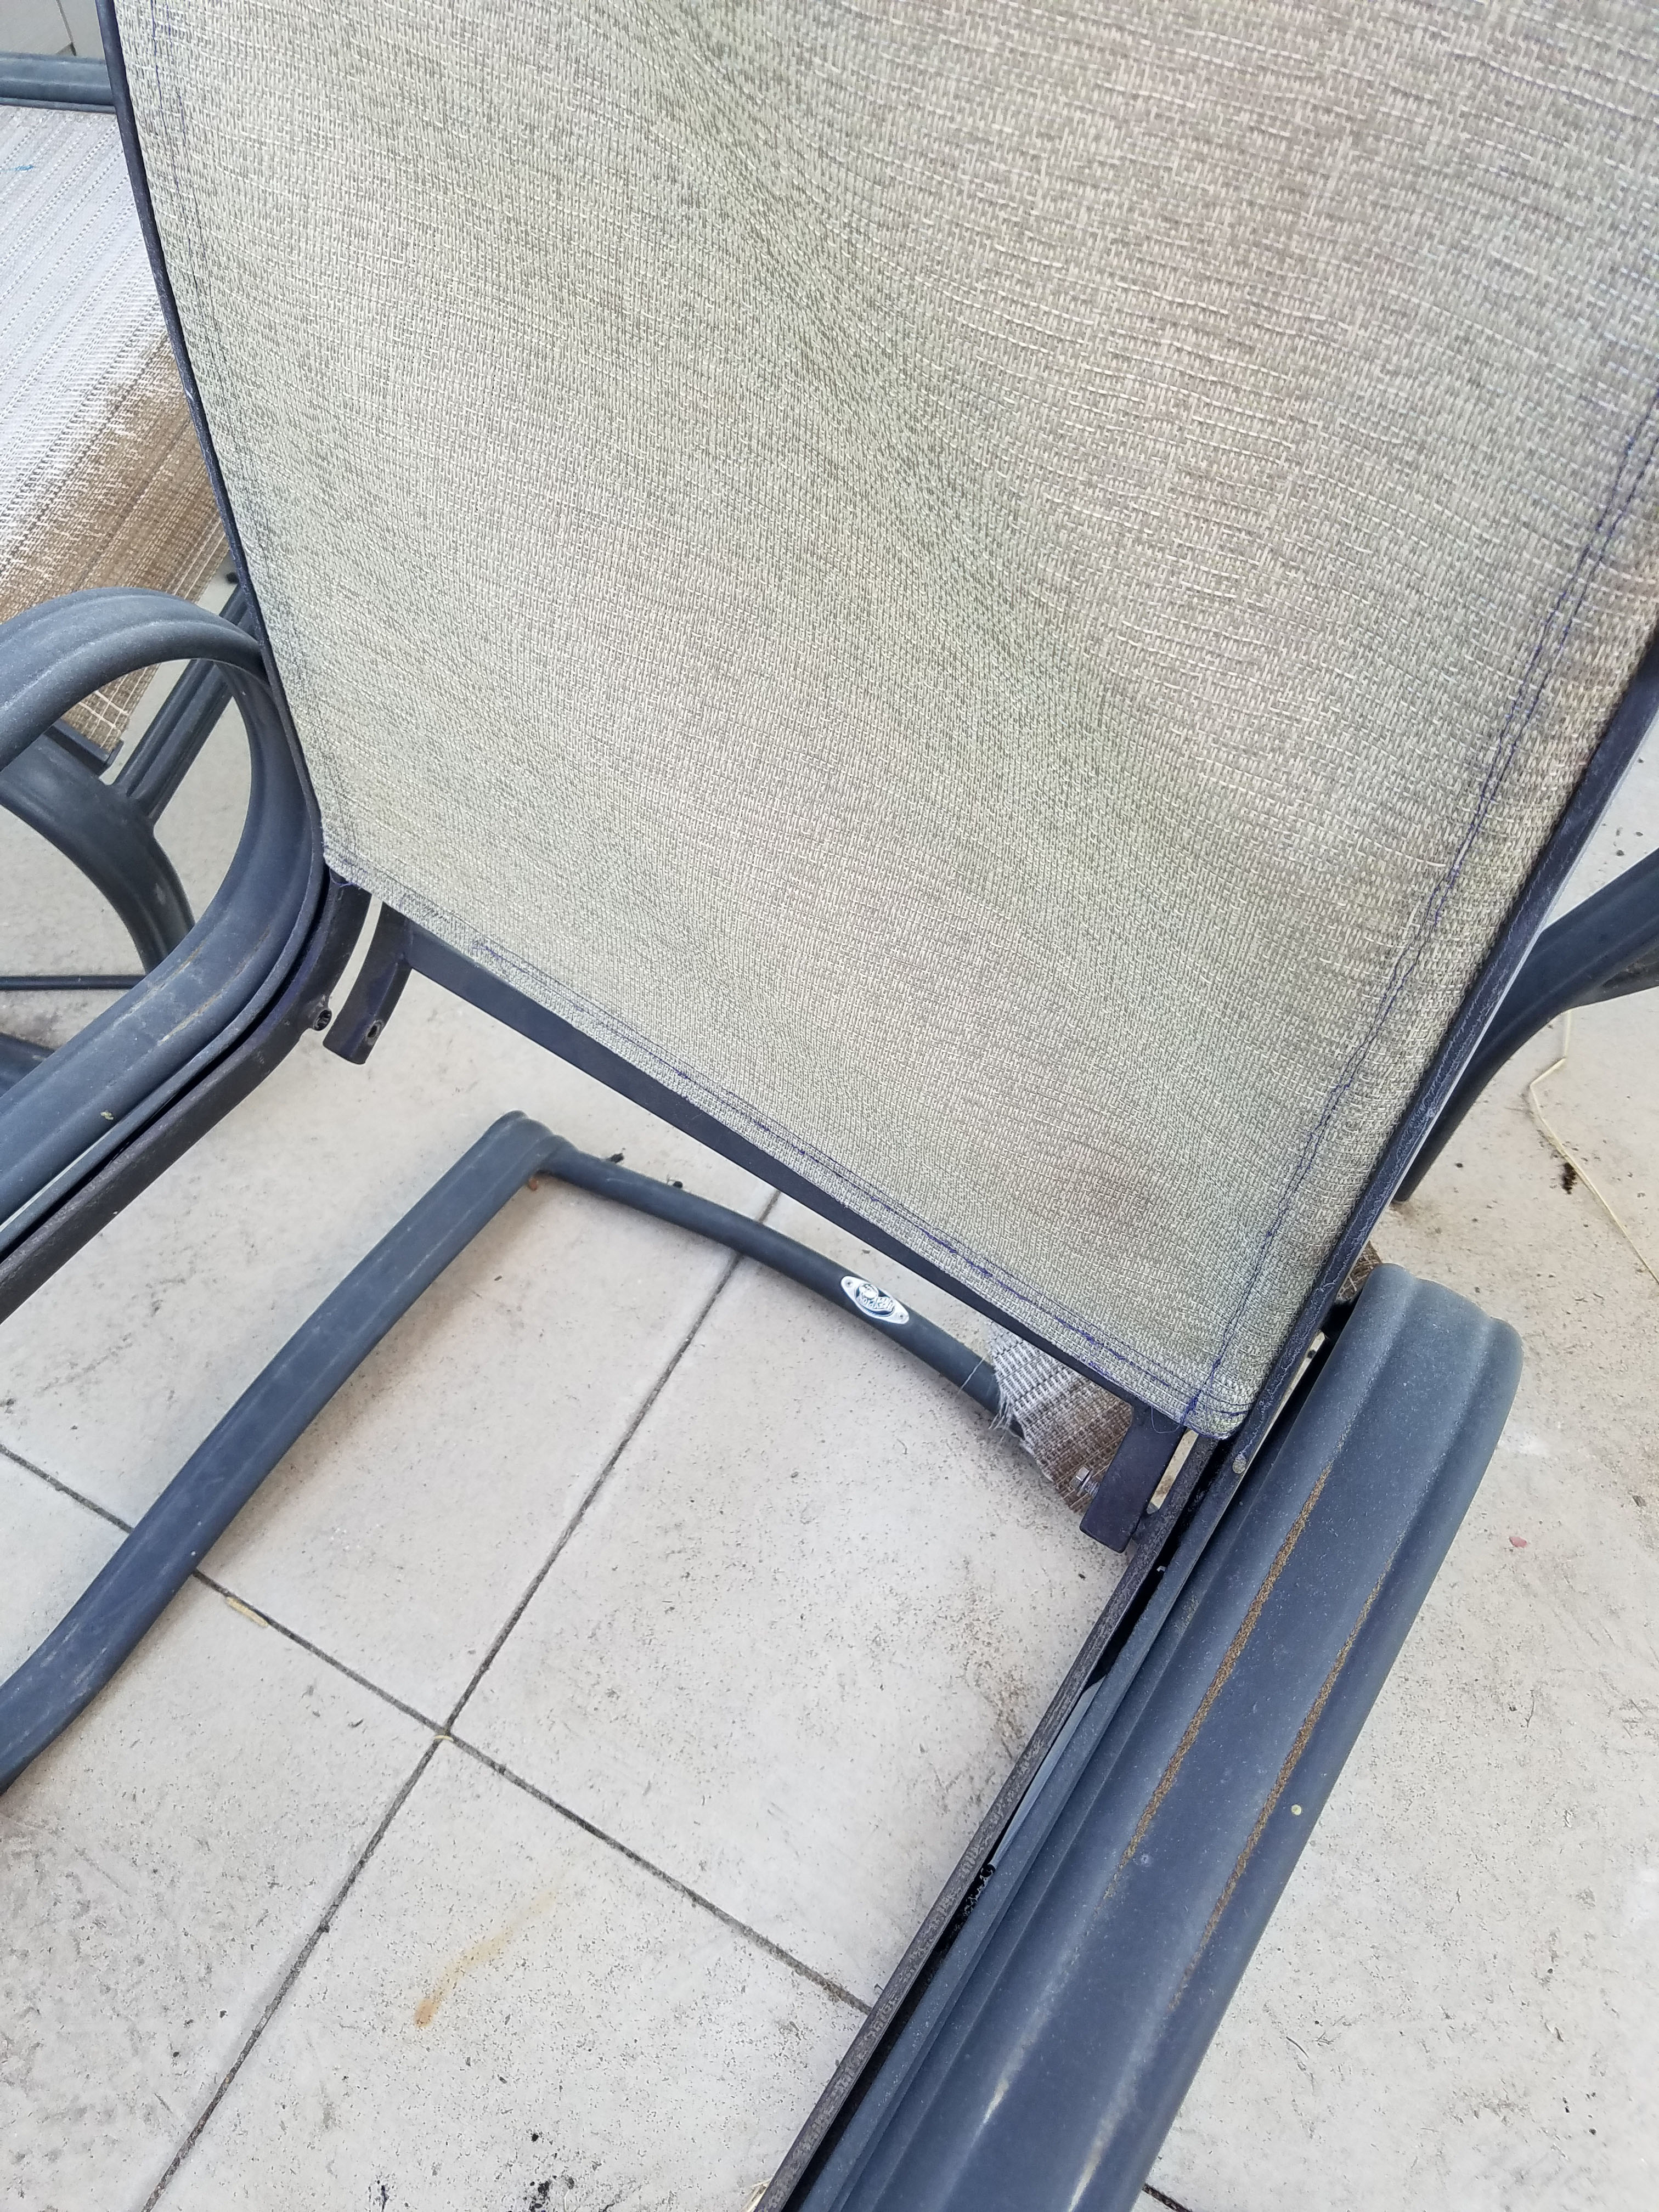
Once you are done you insert the cording, cut it to length and you are ready to put the sling in the chair. This is where the video is great help even if you order a pre-sewn sling. As the video suggests, getting the sling into the chair is the hard part. The video spends more time on this part than the measurement, cutting and sewing combined. There were a couple of tools Sailrite recommends that I went out and bought. This included the silicone spray for making the fabric slide into the chair with less effort. I also bought the cool Irwin spreader clamp he recommended. This added another $25 to the cost, but I would also have needed it if I ordered a pre-cut fabric. I love new tools and so I was happy to have a reason to buy this. It is probably possible to reassemble the chair without using this clamp but it made it a lot easier.
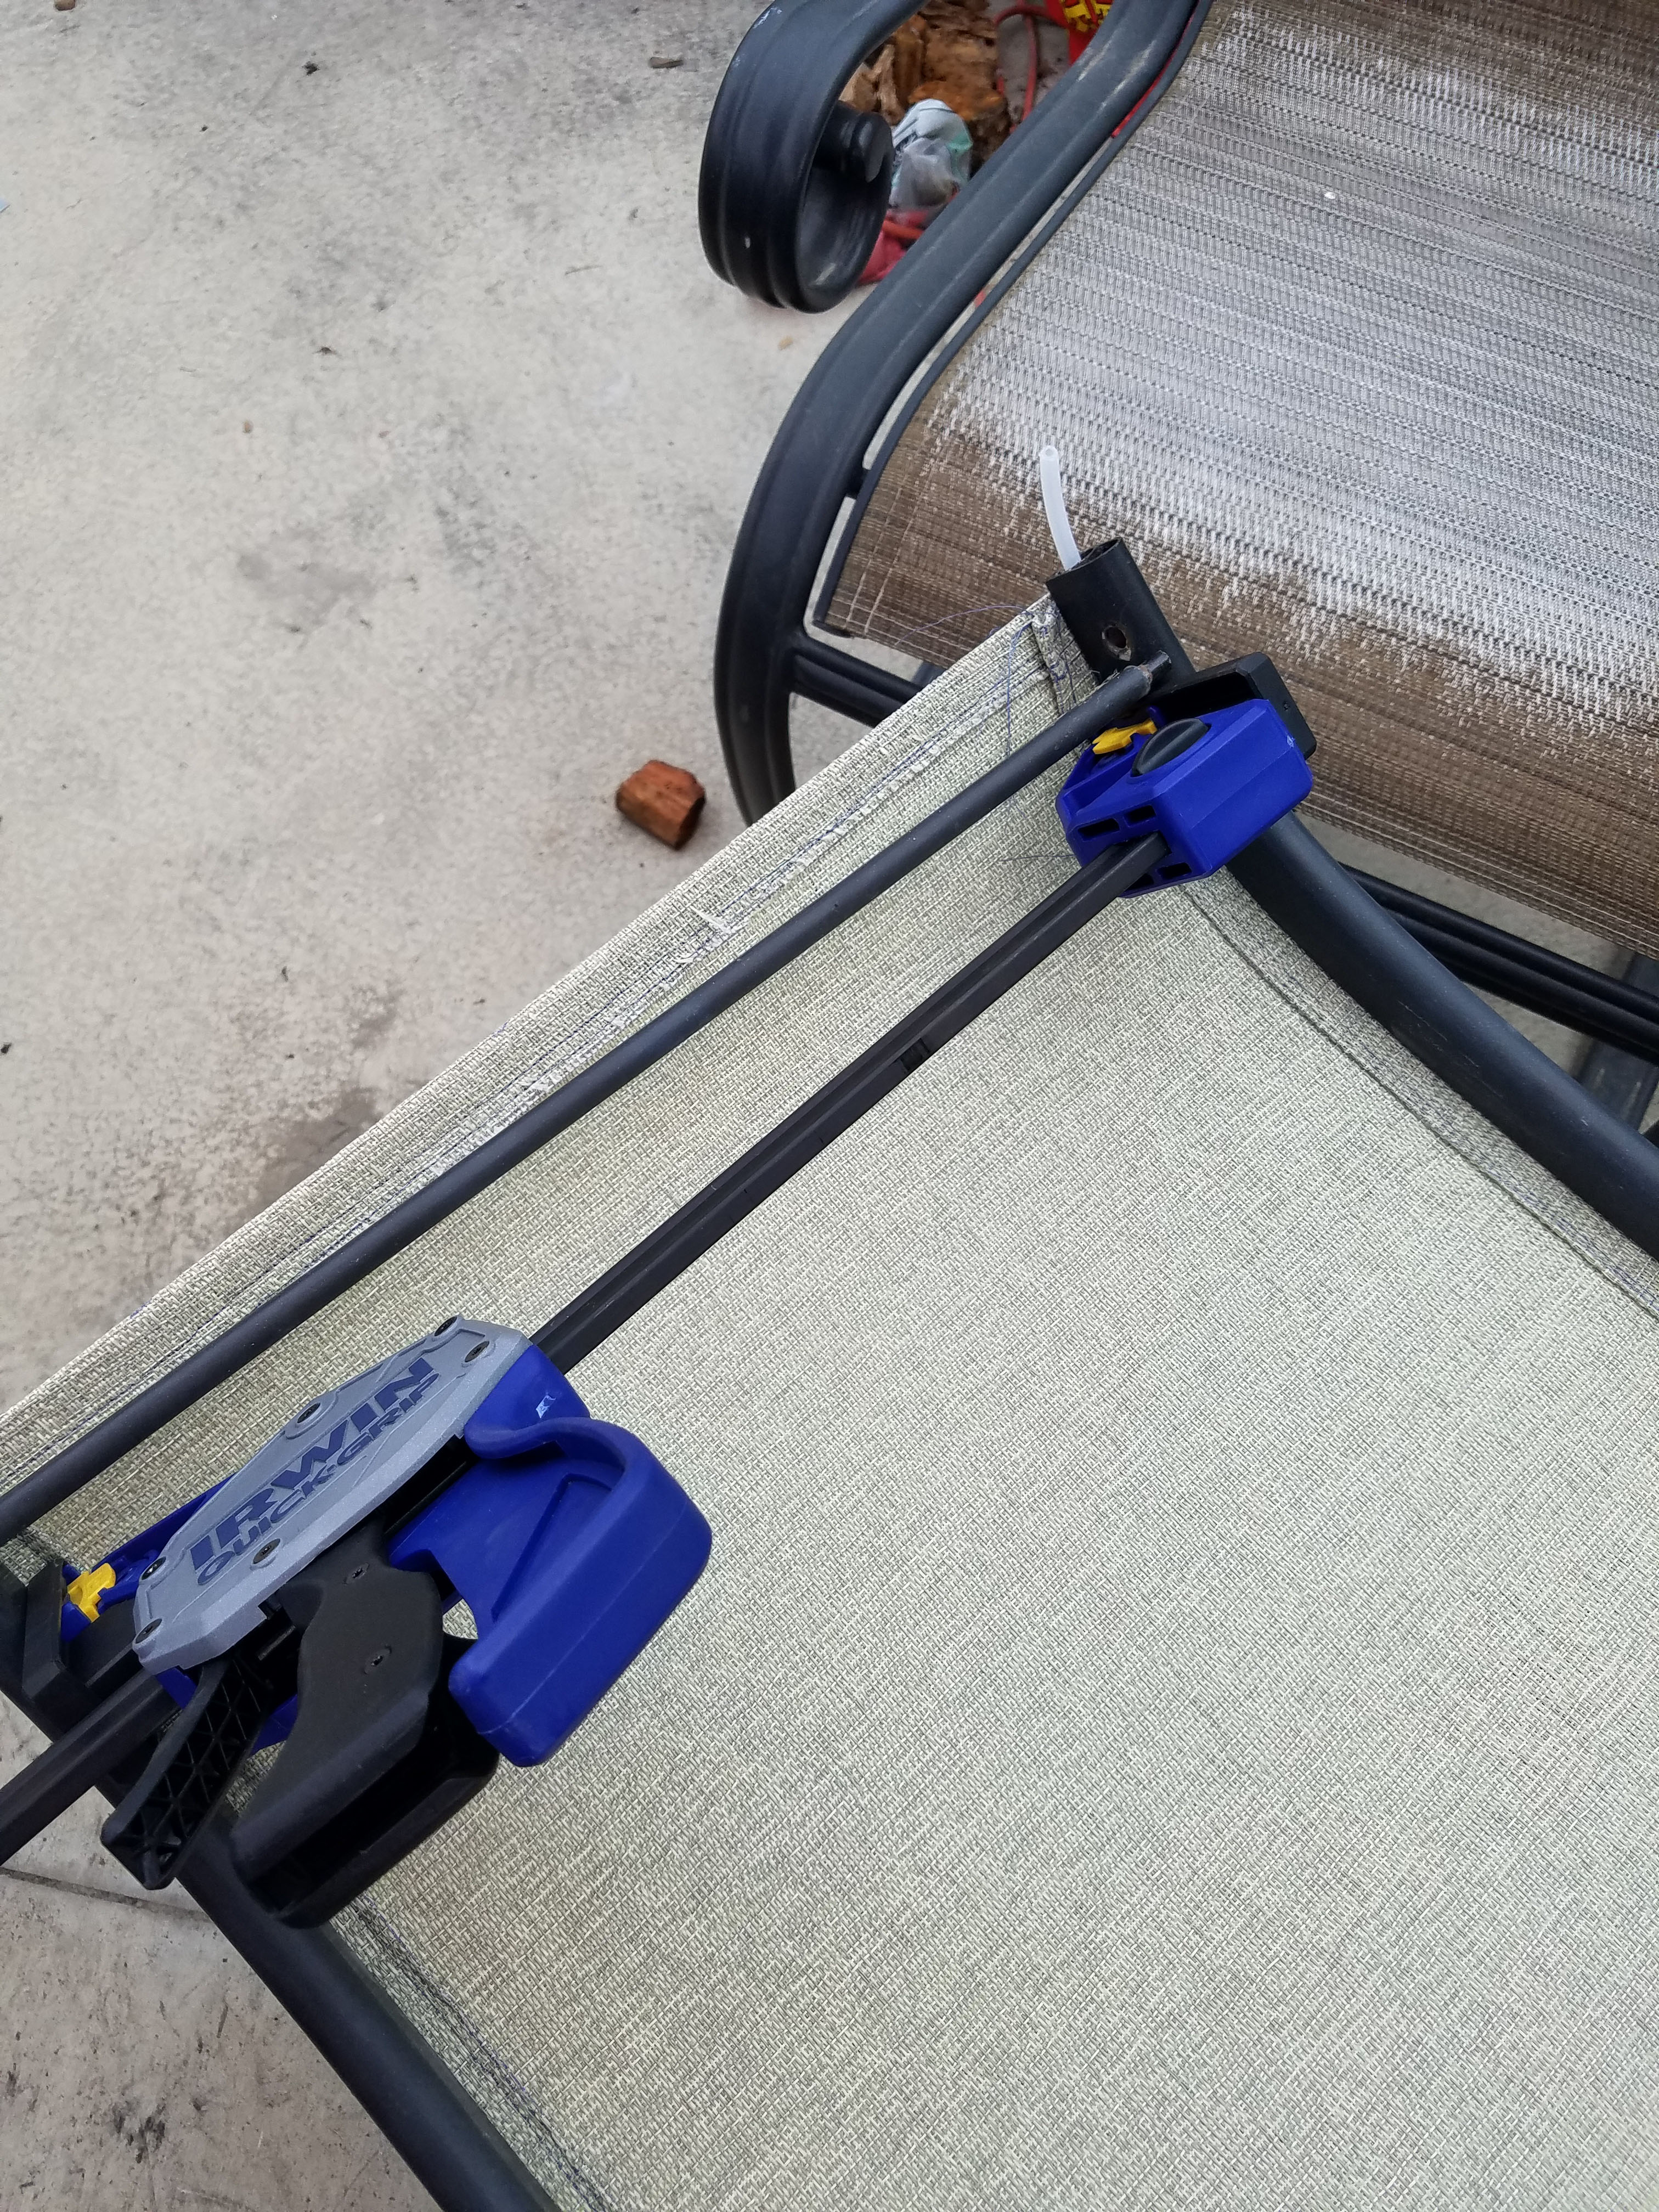

The hard part is pulling the fabric through the rails. Removing the end caps was also somewhat tricky, mainly because they were so worn. Some chairs were easier than others, but I would say the average time for replacing the completed sling was 15 minutes per chair. Note, I did not fully disassemble the chair as they did in the Sailrite video. Basically, the main challenge is this involves a great deal of frustrating pulling to get the fabric through. You can see the grimace on the guy’s face in the video and I am sure I looked the same. Of course, disassembly and assembly will vary by the type of chair, but I think the principal remains the same.
Over all, I was really pleased that I replaced the slings on the chair instead of simply throwing them out. Not only did I save $400, but I feel I did my part in not adding more junk to the landfill. My parents and grandparents kept furniture around for years while recent generations are more disposable. As the population increases I think access to cheap disposable material has the potential to exponentially increase what goes into our landfills.
NOTE: This was a completely independent review. We have no relation to Sailrite and received no compensation.
Once again the full video is at https://www.sailrite.com/How-to-Replace-Fabric-on-a-Patio-Sling-Chair